

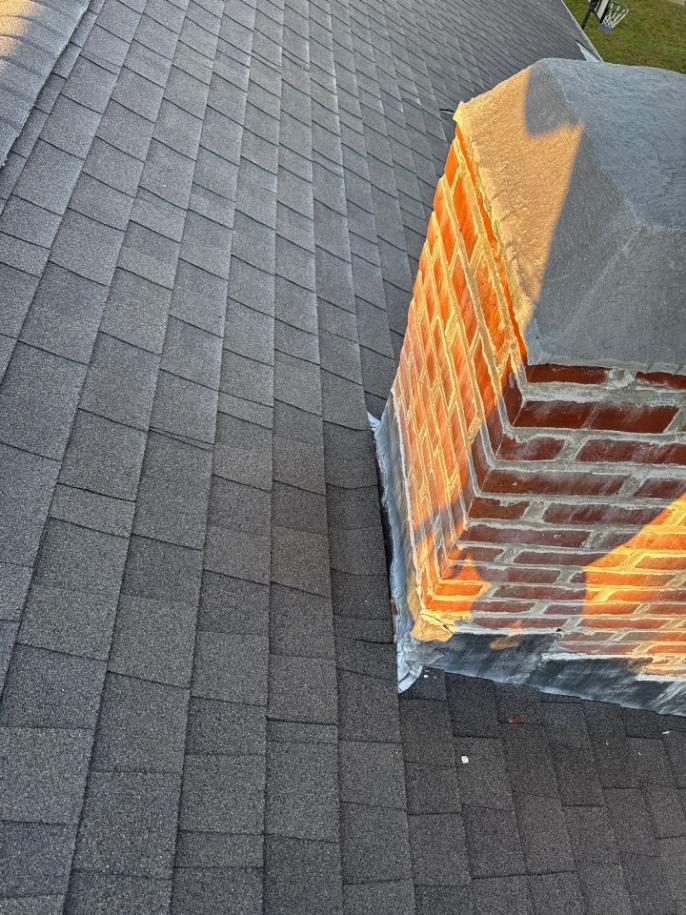
Understanding chimney flashing components, identifying common water-entry points, and recognizing when professional roof repair is necessary.
Where a brick chimney meets an asphalt shingle roof, multiple building materials come together at one of the roof’s most important weatherproofing connections. This junction needs a properly integrated flashing system to direct rainwater away from the chimney and prevent moisture from entering the roofing structure.
Chimney flashing on asphalt shingle roofs protects this vulnerable transition. When the metal components become damaged, loose, or improperly integrated with the shingles, water can enter beneath the roofing surface and potentially affect the roof deck and interior of the building.
Understanding the construction of chimney flashing and recognizing common leak points helps homeowners make informed decisions about roof maintenance and repairs.
Common causes of chimney flashing leaks include damaged metal flashing, deteriorating chimney mortar joints, failed sealant connections, and incorrect shingle-to-flashing overlaps. Proper inspection should identify the actual water-entry point before repair begins.
Why Chimney Flashing Is Essential for Asphalt Shingle Roofs
A sloped roof normally directs rainwater downward across the shingle surface. A chimney interrupts this natural drainage path, creating additional connections that must be protected from water intrusion.
Chimney flashing creates a protective transition between the masonry and the surrounding roofing materials. Its components work together to control water movement and maintain the weather resistance of the roof assembly.
Properly installed chimney flashing helps:
- Direct rainwater away from the chimney base.
- Protect the underlying roof decking against moisture.
- Reduce the risk of water entering around masonry structures.
- Maintain the connection between asphalt shingles and chimney surfaces.
- Support the long-term weather resistance of the roofing system.
Homeowners planning roofing work can explore the residential roofing solutions available from RHODY Ridge Roofing.
Understanding the 4 Main Chimney Flashing Components
A chimney flashing assembly is not simply one piece of metal. Different components protect different sides of the chimney and help maintain a continuous water-shedding path.
Apron or Base Flashing
Apron flashing is generally positioned along the lower side of the chimney where the masonry meets the sloped roof. It directs water away from the chimney and over the surrounding shingles, allowing it to continue down the roof.
Step Flashing
Step flashing is installed along the sides of the chimney. Individual metal pieces are integrated with successive asphalt shingle courses to help prevent water from moving behind the roofing materials.
Counterflashing
Counterflashing covers the upper edge of the underlying flashing and connects with the chimney masonry. This protects the upper flashing connection from water entering behind the metal assembly.
Back-Pan Flashing and Chimney Cricket
The uphill side of a wider chimney may require additional water-management components. A back-pan or cricket can direct water around the chimney instead of allowing it to collect behind the masonry structure.
Common Chimney Flashing Problems That Cause Roof Leaks
Flashing problems can develop over time because of weather exposure, material deterioration, movement between building materials, or incorrect installation. The following conditions are common areas to evaluate when investigating a chimney-related roof leak.
Damaged or Loose Metal Flashing
Metal flashing remains exposed to temperature changes, moisture, wind, and long-term weather conditions. Individual sections may eventually become loose, separated, corroded, or physically damaged.
When openings develop around the chimney intersection, rainwater can penetrate beneath the flashing and reach the underlying roofing materials.
Deteriorating Chimney Mortar Joints
Counterflashing depends on a secure connection with the chimney masonry. Cracked or deteriorating mortar joints can weaken this connection and create potential water-entry points.
Both the mortar and surrounding metal flashing should be evaluated when investigating moisture near the chimney.
Aging or Failed Sealant
Sealants may be used at certain flashing connections to protect exposed joints. However, prolonged exposure to changing weather conditions can cause these materials to crack, shrink, or separate.
Adding more sealant without addressing damaged flashing or incorrect installation may not provide a lasting repair.
Improper Shingle and Flashing Overlap
Asphalt shingles and metal flashing must be integrated in the correct sequence. Incorrect placement can interfere with water drainage and allow moisture to travel beneath the roofing materials.
Warning Signs of Chimney Flashing Damage
Early identification of flashing problems can help homeowners arrange an inspection before moisture affects additional parts of the roofing structure.
Not every leak near a chimney originates from flashing. Damaged asphalt shingles, masonry defects, deteriorated roof decking, and other nearby connections may also contribute to water intrusion.
How Professional Chimney Flashing Repair Works
Effective chimney flashing repair begins with identifying the actual source of water intrusion. Applying sealant to a visible gap may not resolve a problem caused by damaged metal, deteriorated mortar, or incorrectly integrated flashing.
A professional inspection generally evaluates the following areas:
Inspect the Existing Metal Flashing
Check for corrosion, loose sections, physical damage, and separation around the chimney.
Evaluate the Masonry Connection
Examine counterflashing connections and surrounding mortar joints for cracking or deterioration.
Check the Surrounding Asphalt Shingles
Evaluate shingle condition, flashing integration, overlaps, and possible water-entry points.
Examine the Roof Deck
Look for moisture damage or deterioration in the materials surrounding the chimney.
Determine the Appropriate Repair
Depending on the findings, repairs may involve replacing damaged flashing, correcting overlaps, repairing masonry connections, or installing new flashing components.
RHODY Ridge Roofing offers Chimney Re-lead Flashing services for chimney-related roofing concerns.
Our team also provides roofing repair services for homeowners dealing with damaged roofing materials and water intrusion.
How Homeowners Can Protect the Roof Around a Chimney
Maintaining the connection between a chimney and an asphalt shingle roof is an important part of residential roof protection.
Homeowners can pay attention to these maintenance considerations:
- Arrange an inspection when visible flashing damage appears.
- Address deteriorating mortar joints around the chimney.
- Check for loose or separated metal flashing.
- Pay attention to interior water stains near the chimney.
- Have surrounding shingles evaluated when flashing repairs are needed.
- Investigate suspected water intrusion before moisture spreads into the roof structure.
These steps help identify developing concerns and determine when professional repair is appropriate.
Protect Your Roof With Proper Chimney Flashing
Chimney flashing is an essential part of an asphalt shingle roofing system. Apron flashing, step flashing, counterflashing, and properly designed back-pan components work together to direct water away from the chimney and protect vulnerable roof connections.
Damaged metal, deteriorating mortar, failed sealant, and incorrect shingle overlaps can all contribute to chimney-related leaks. Identifying the actual source of moisture is an important part of selecting the correct repair approach.
Homeowners in Cranston and surrounding Rhode Island communities should address visible flashing problems before moisture damage spreads into other parts of the roof.
Looking for Chimney Flashing or Roof Repair Services?
RHODY Ridge Roofing provides roofing solutions for homeowners in Rhode Island. Explore our services for assistance with chimney flashing concerns and other residential roofing needs.
Frequently Asked Questions About Chimney Flashing
1. What is chimney flashing on an asphalt shingle roof?
Chimney flashing is a protective metal assembly installed where a chimney meets the roof. It directs rainwater away from the connection between masonry and asphalt shingles, helping reduce the risk of water intrusion.
2. What are the main components of chimney flashing?
A typical assembly may include apron or base flashing, step flashing, counterflashing, and back-pan components. A chimney cricket may also be used to direct water around wider chimney structures.
3. Why does a chimney leak when it rains?
A chimney may leak because of damaged metal flashing, deteriorating mortar joints, failed sealant connections, or improperly integrated shingles. Other roofing and masonry problems can also cause water intrusion.
4. How can I tell if chimney flashing is damaged?
Common warning signs include water stains on nearby ceilings, visible gaps around the chimney, loose flashing sections, cracked mortar joints, damp insulation, and leaks following heavy rain.
5. Does chimney flashing need to be integrated with asphalt shingles?
Yes. Flashing must be integrated with the shingle courses in the correct sequence so rainwater flows over the exposed surfaces rather than behind the roofing materials.
6. Can sealant alone fix a leaking chimney?
Not always. Sealant can protect certain exposed joints, but it cannot replace damaged metal flashing or correct improper installation. The underlying problem should be identified before selecting a repair method.
7. What is the purpose of a chimney cricket?
A chimney cricket is a raised, sloped structure installed on the uphill side of certain chimneys. It helps divert rainwater around the chimney instead of allowing it to collect behind the masonry.
8. When should chimney flashing be repaired?
Chimney flashing should be evaluated when visible gaps, loose metal sections, deteriorating mortar connections, or signs of water intrusion appear. An inspection helps determine whether repair or replacement is appropriate.
9. Can a roof leak near a chimney come from another area?
Yes. A nearby leak may originate from damaged shingles, roof penetrations, masonry defects, or other roofing connections. A professional inspection can help identify the actual water-entry point.
10. Why hire a professional for chimney flashing repair?
Professional repair helps ensure that existing flashing, surrounding shingles, masonry connections, and roof structure are evaluated together. This helps identify the underlying issue and determine an appropriate repair solution.


